If you are a studio supporter on Patreon, you can use the Moulinette plugin in FoundryVTT to access Studio WyldFurr’s map tiles, and the Props and Objects token packs.
This tutorial assumes that you have already installed and setup the Moulinette plugin for your FoundryVTT application.
Step #01 – Create a Blank Scene
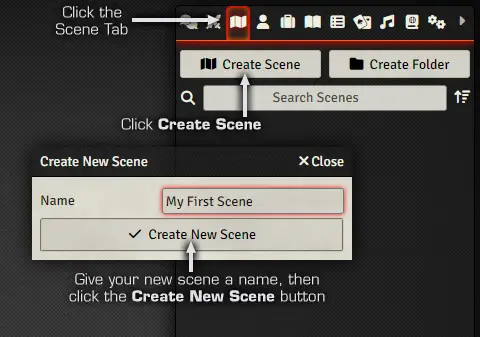
Begin by creating a blank scene to act as your map canvas. You can do this by clicking on the Scenes tab at the top of the right hand side panel to open up the Scenes menu in that panel area.
Then click on the Create Scene button to open the Create New Scene panel. Give your new scene a name and then click the Create New Scene button to create the new blank scene in your campaign world.
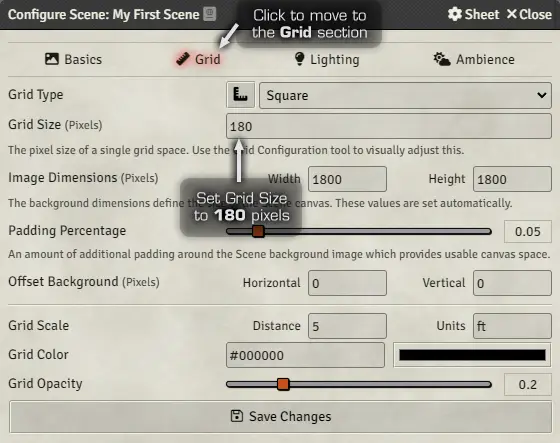
The Scene Configuration Panel will appear, for our purpose we are going to leave all of the settings at their default settings, except for the map grid which will will configure to use the same dimensions as our Map Tiles art assets and Tokens.
To do this, click on the Grid heading to change to the configuration settings for the Grid. Make sure that the Grid Type is set to Square, and then change the Grid Size from the default 100 pixels, to 180 pixels.
At this point you will also want to consider how large you want your map to be. Do you want to create a large area map or a small encounter map? This is important because you need to set the Image Dimensions in pixels for your Scene Map Canvas.
To set the size you need to consider how many map grid squares wide and tall your map will be. For a small encounter map, a ten by ten grid squares map may be appropriate. A ten by ten map is equal to an area of 50ft square, since each map grid square is a 5ft square.
All Studio WyldFurr map tiles and token assets have been designed to fit a 180 pixel grid square. This gives us a scale of 3 on screen pixels to each real world inch. Thus to work out our image dimensions, we take the number of grid squares in width, and multiply that number by 180 to give us the width in pixels.
Thus, a map with ten grid squares in width, will be:
180 pixels multiplied by 10 grid squares in width = 1800 pixels
Since we are creating a map that is square, we can enter 1800 pixels as the height and width of our map.
Once you have entered the image dimensions, click the Save Changes button and the panel will close and you will be looking at your new blank scene map canvas.
Padding Percentage: By default there is a Padding Percentage factor that adds a border around the edge of the scene map. This space is good for staging assets before they make an appearance on the scene. I personally turn this down to 0.25 to just have a one grid square border, as I find one grid square is enough. But set this to give you whatever space you need.
Step #02 – Open the Assets Browser
Once you have setup your blank scene map canvas, you will need to open the Moulinette Asset Browser Panel. This panel can be accessed by first, clicking on the Moulinette Button (the button with the hammer icon), and then clicking on the Tiles/Tokens button (the button with the puzzle piece icon). Doing so will open the Moulinette Assets Browser panel.
The Moulinette Assets Browser is the workhorse end of Moulinette, and it is where you will find each of the packages from Studio WyldFurr that you will use to construct your adventure map.
First, get the Asset Browser into the right mode by clicking on the Tiles/Tokens heading to switch to the Tiles and Tokens browser function of the panel.
Before you begin looking for assets to use, you need to tell the panel how you want Moulinette to handle those assets when you drag-n-drop them onto the map canvas. At the bottom of the panel are some options that control how assets are placed from the panel onto the map canvas.
The first setting is the Drop As… option. Set this to Drop as Tile so that assets are dropped onto the canvas as tiles.
The next option to set is the Asset Grid Size, change it from the default 100 pixels, to 180 pixels.
Now you need to find the package of art assets you want to use. Click on the Creators drop down menu and select Studio WyldFurr from the list of creators. Besides that drop down menu is another menu where you can select the package you wish to use. In the sample diagram we have selected the Sample Map Tiles package.
Once you have selected the package you want to use, the Moulinette Assets Browser will begin to load the preview icons of the assets from the pack. The speed of this action is determined by your internet connection.
Step #03 – Setup your Workspace
At this point you will want to setup your workspace to enable speedy map creation. We will want to move the Asset Browser to the right and change it’s size so that it is covering up FoundryVTT’s right hand side menu area.
We cover up that strip of menu, because we are not going to need it while we are building a map. During map construction, you only need to see the Blank Map Canvas, and the Asset Browser. This setup allows you to browse the assets, and then drag-n-drop them onto the map canvas.
Step #04 – Working with Map Tiles
Once your workspace is setup, with the Asset Browser off to the right and the blank canvas area on the left. You are almost ready to start building your adventure map.
So that you can manipulate each tile once it is placed on the map canvas, you need to active the Tile Controls button so that you can move and edit placed tiles. This is done by clicking on the Tile Controls button in the far left column of buttons. You will know it is active because the button will glow orange.
With the Tile Controls active, you can begin to drag-n-drop assets from the Moulinette Asset Browser onto the map canvas. When dropping a tile onto the canvas it may not be in the right place, just click-n-drag it into the right place and it should snap into position.
Sometimes a tile will not be in the right place, or it may end up behind a tile that it should be in front of. This is easy to fix. Right click on the tile and a set of control buttons will appear. These buttons have the following functions:
- Overhead – FoundryVTT has two main layers of a map. Clicking this button will move the tile to the overhead layer. The overhead layer is good for objects that appear above a character, such as the upper branches of a tree or a buildings roof.
- Underfoot – Akin to the overhead button, this button moves tiles to a layer that appears below the character. Good for tiles such as floors and ground textures.
- Bring to Front – Moves the tile above other tiles on the current layer.
- Send to Back – Moves the current tile under other tiles on the current layer.
- Toggle Visibility – As the names states, this button toggles between visible and invisible for the currently selected tile.
- Lock – This button locks the currently selected tile so it can not be edited.
You now have all of the essential map building skills to gather assets from Moulinette and build adventure maps inside FoundryVTT.
Map Building Livestream Tutorial
Tailz did a Livestream a little while ago to show how you can create an adventure map using Moulinette and our Map Tiles.
- How to install Moulinette into FoundryVTT – This tutorial deals specifically with installing the Moulinette plugin and activating it so you can access your Patreon rewards inside FoundryVTT.
- How to access Virtual Tabletop Tokens with Moulinette in FoundryVTT – This tutorial deals with how to correctly scale and size tokens in FoundryVTT. Also how to use Wildcard tokens.
- How to load an adventure module with Moulinette in FoundryVTT – This tutorial walks you through searching for and then loading one of the Studio WyldFurr adventure modules into FoundryVTT via the Moulinette plugin.


