This tutorial takes a look at using Studio WyldFurr’s Map Tiles art assets in FoundryVTT for the purpose of building roleplaying adventure maps. We will look at where to place your map tiles art assets and how to setup your work space for map building. Lastly we will look at the tool set within FoundryVTT that control the placement of map tiles.
![]() Recently I got my paws on FoundryVTT and decided to give it a spin. So far I’m really happy with how the program works and how it handles running a roleplaying session online. I can see why it has become so popular!
Recently I got my paws on FoundryVTT and decided to give it a spin. So far I’m really happy with how the program works and how it handles running a roleplaying session online. I can see why it has become so popular!
I’ve taken a few moments to play around with the map building tools inside FoundryVTT to see how you can use my Map Tiles inside the App to create adventure maps.
Step #1: Grab your Map Tiles!
The first step is to collect all of your art assets together into a folder for easy access inside FoundryVTT. This can be done in two ways, manually importing the assets, or if you are a studio supporter on Patreon, using the Moulinette plugin.
This tutorial will show you how to manually import a pack of Map Tiles into FoundryVTT, if you are using the Moulinette plugin I recommend you read this tutorial.
Gather up the art assets you want to use to create your map into a single folder called art-assets, and place the art-assets folder into the World Folder for your Campaign. You can find theWorld Folder for your campaign in the following folder path (Windows PC):
C:\Users\your-name\AppData\Local\FoundryVTT\Data\worlds\my-campaign-world
Now that the files are in your campaign folder, you can access them via FoundryVTT and FoundryVTT can now share the files to your players.
Step #2: Setup the Scene
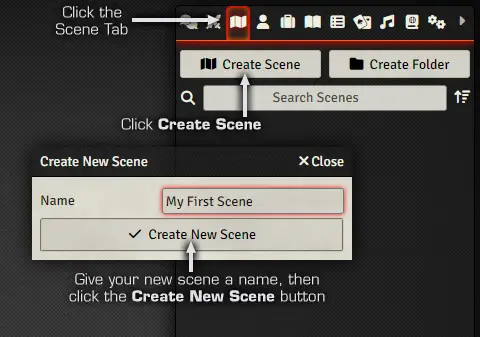
FoundryVTT looks at an adventure a bit like a Playwright looking at a script. The adventure is broken into Scenes that each include a map where the scene takes place. So begin by clicking on the Scenes Directory tab to make that sidebar active, then click on the Create Scene button to open a small popup that will ask you to give the Scene a Name. Give the new scene a name, and then click Create New Scene.
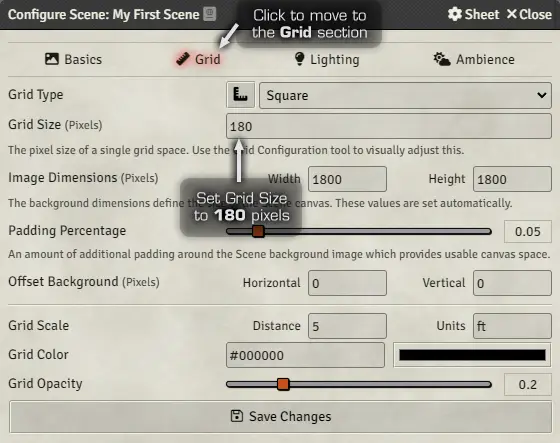
A new blank scene will be created and the Configure Scene menu panel will appear.
Because we are going to be creating our adventure map from scratch with art assets, we can leave pretty much all of the default settings in place for the scene.
All we need to do is click on the Grid option at the top of the panel to move from the Basics Setting Page, to the Grid settings page. Then change the Grid Size (pixels) from the default 100 to 180. Which is the grid size I use for all Studio WyldFurr tokens, map tiles, and adventure modules.
Step #3: Get the Tile Browser Ready
Now that you have created a new blank scene, and set the grid to 180 pixels. We can setup the next panel we are going to need which is the Tile Browser Panel which we will use to browse through the art assets before we drag-n-drop each onto the map canvas.
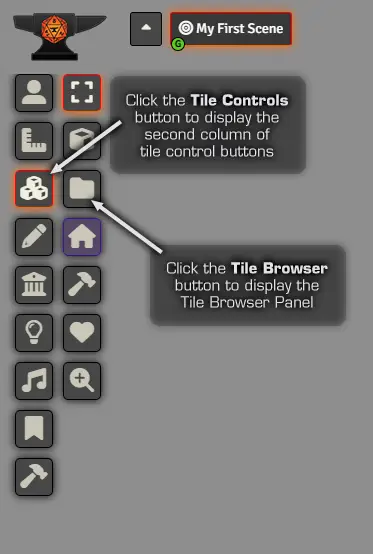
If you look over to the left hand side of the screen, you will find a bunch of buttons in two columns. The buttons in the left column are the main function mode, while the buttons in the right column are the options that are available for that selected mode.
For example, the first button in the left hand column looks like a little head and shoulders icon, that is the Token Controls mode button. With it highlighted the right hand column buttons will be the functions that can be used to manipulate tokens.
The third button down the list in the left column, has an icon that looks like three boxes. That button is the Tile Controls button. Click on it to change the buttons in the right column into the Tile Control Buttons.
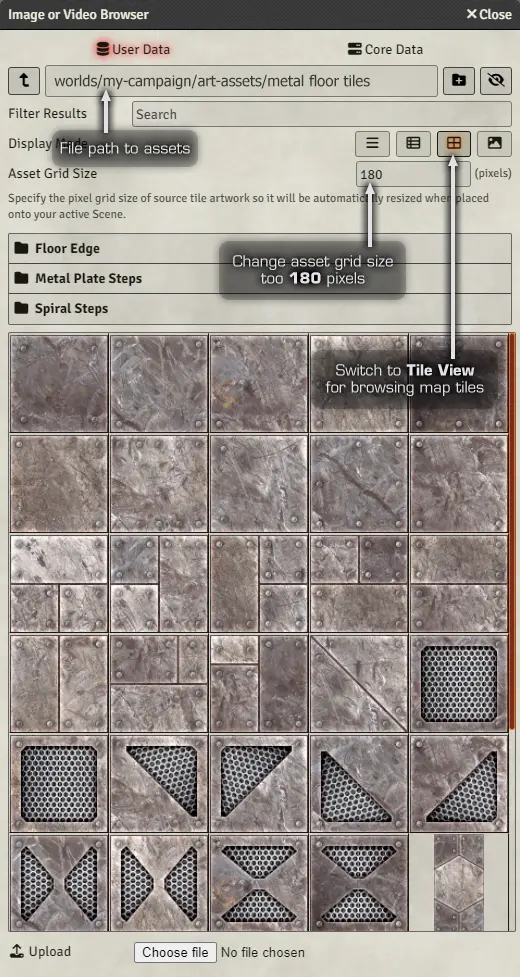
In the right side column, click on the third icon from the top titled: Tile Browser. Doing so will open a new panel that is the Tile Browser, where you can locate each of your art assets.
Move the Tile Browser panel off to the far right hand side of the desktop so that you can see the Tile Browser Panel and the blank map.
Step #4: Build that Map!
Now that you have the Tile Browser Panel open and in a position where you can easily access it without it getting in the way of the map. You can start building your map.
In the Tile Browser, browse through the folders of assets and locate each map tile that you want to place onto the map canvas. To place a tile, just click on it, then drag it from the Tile Browser Panel onto the map canvas. The tile will snap into position using the map grid.
At this point you can start building your map, just drag in each new tile and move them into place. But this is also a good point to explain the simple tile management used in FoundryVTT.
Forground and Background Tiles
FoundryVTT makes use of a simple forground and background arangement to render placed art assets. As you place tiles onto the map canvas, they are essentialy placed into the background. But when you place a tile on top of another tile, it is placed in the forground above that tile. To change the rendering order of a tile, click on it to select it, then right click on it to bring up a set of buttons that control the following settings: Overhead Tile, Bring to Front, Send to Back, Underfoot Tile, Toggle Visablity State, Toggle Locked State.
Use the Bring to Front and Send to Back buttons to move a tile above or below other tiles that share the same position. For example, Wall tiles should be above Floor tiles. While door art assets should be above wall tiles.
Continue to place down tiles until your map is just how you want it. Then once you have finished the map, don’t forget to add in Props and Objects so that the map has lots of character than just a bunch of emply rooms.
![]() Like most virtual tabletop programs, I don’t think you want to make building adventure maps inside them a standard practice.
Like most virtual tabletop programs, I don’t think you want to make building adventure maps inside them a standard practice.
As much as you can build an adventure map inside FoundryVTT, it does not have the ability to flatten or compress the map once it is finished. Resulting in adventure maps with lots of parts that can be a drag on low end computer systems.
For example, you might use 100 art assets to create a battle map for an encounter. That means your computer – and the computers of your players – has to manage all of those assets to maintain the map, plus any dynamic lighting and whatever tokens and artwork assets you will add during a scene.
So as much as you can build adventure maps in FoundryVTT – in my opinion – it is best to build maps in GIMP or Photoshop and then import the flattened image into FoundryVTT.
Live Stream Video: Testing Map Tiles in FoundryVTT
Take a peek at the recorded video of Tailz experimenting with the map tiles in FoundryVTT by visiting our Studio YouTube Channel.


